Using InDesign, create five different postcards as a souvenir of your favorite places, cities, celebrations, or events in life.


PLEASE NOTE THAT IN THE EXAMPLE PROVIDED, ALL POSTCARDS HAVE THE SAME MESSAGE AND TYPOGRAPHY: YOU MUST ADJUST THE MESSAGE, THE COLORS AND THE CHOICE OF FONTS (Serif, Sans Serif, Monospace) TO THE IMAGES. YOU CAN ALSO MODIFY THE BACK OF THE CARDS TO EACH UNIQUE DESIGN, IT DOESN’T NEED TO BE THE SAME FOR ALL.
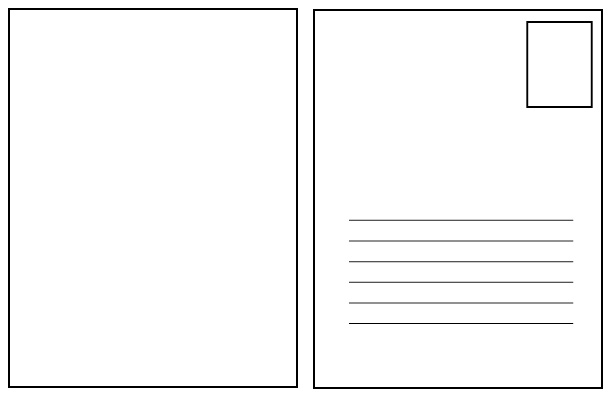
The 5 postcards spread must have no gutter, have a defined grid, adjacent front and back pages, and bleeding is optional (if needed). One column in the front, and two columns in the back. You can repeat the back template for each postcard.
You MUST use photos that you took yourselves for the 5 different covers (to avoid copyright issues), and you can add any message that you want. You are allowed to appear in the photos, but remember what is the purpose of the card.
You will use Photoshop and Illustrator to develop and optimize the assets.
The front of the card must be in COLOR, no pixelation visible at all, high resolution. You MUST use FIVE different fonts, one for each cover, and a different message for each postcard. The back can use the same font for all of them.
The back of the card must be in Black and White, with a traditional postcard design; the left column for your written message, and the right column with a place for the stamp, and an area to write the address. Bonus point: you can add your own images in the stamp area (placeholder).
8.5 x 5.5 inches, RGB color, at least 150dpi
Please add in a smaller font your credits, so we know who is the author. This is important necause these are YOUR images.
Your Name • FMX 210 • Section N • Term Year
for example
Leigh Bowery • FMX 210 • Section 3 • Spring 2028
You can also add any information in the back of each postcard about the images in a very small font.
You will package your INDD project and upload the zipped folder to Dropbox:
To package an InDesign file, go to File > Package, which collects the INDD file, linked graphics, and fonts into a single folder for easy sharing. After clicking Package, You MUST include a PDF preview, and a separate folder for fonts and links. This process is essential for ensuring a collaborator or printer has all the necessary assets to open and print your document correctly.
- Open your InDesign document and go to File > Package.
- Click the Package button in the dialog box that appears to save your file if you haven’t already.
- Choose a location and name for the package folder and click Package again.
- Review the options to include an IDML file, a PDF, and check the settings for fonts and graphics.
- Click Package and then OK to create the folder.
- Compress and upload the resulting folder to Dropbox
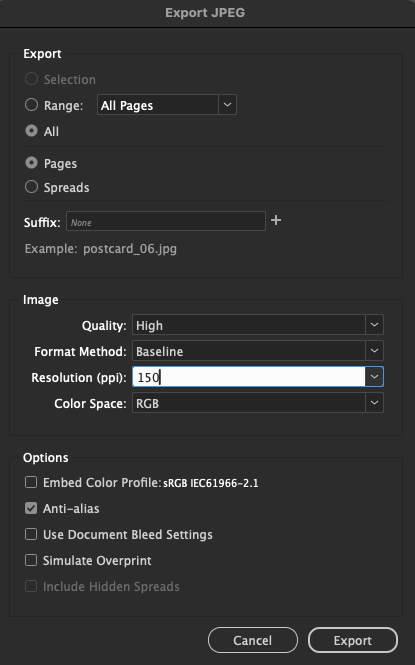
- AFTER UPLOADING THE INDD PACKAGE OF YOUR PROJECT to Dropbox, open the file in InDesign > Export > JPG > select your folder or create a new folder > and export all the pages as individiual JPGs in HIGH compression at 150dpi. These are the images you will be able to upload to your blogs, and later can be used in your portfolios.
What to do after packaging in the professional world:
- The package folder contains your original INDD file, an IDML file, and a folder with all fonts and a folder with all linked graphics.
- For easy sharing, compress the package folder into a .zip file. On a Mac, right-click and select “Compress”; on Windows, right-click, go to “Send to,” and select “Compressed (zipped) folder”.
- Send the zipped folder to your printer or collaborator via USB Drive, email, or a file-sharing service.
TUTORIAL: https://youtu.be/UNc_iOJnjVI